Faux Painting.... let's look at that title...
Faux has become a commonly used word in the Home Industry! It is a nicer way to say "fake" or "something like...."
Faux painting adds texture to your walls. Over the years this has become a much more popular way to add interest in place of wallpaper. This is probably why they call it "faux"... faux wallpaper.
I am going to give you a quick guide to the different techniques that artists use when faux painting. This is not an instructional post! I will list a few tips, but not step by step directions. If you want an instructional post, let me know and I can consider putting together a simple "how- to" video to post.
SPECIAL TIP: If you plan to try your hand at a do-it-yourself faux painting technique, practice will pay off!
1. Get a small piece of sheetrock or even foamcore will work; you might want to a few.
2. Paint the boards with your base color
3. Gather your additional colors that will be the faux paint palette and materials you will use for the technique chosen
4. Practice and experiment with mixing the different colors, using different materials to see which will meet your desired effect.
Here are a few techniques that are popular:
SPONGING - this is a technique that is often used by "do it yourselfers"
- it is most important here to use a sea sponge - The spongeing effect gives a soft texture to your walls, adding highs and lows for an interesting effect. It is meant to be an all-over look; blended without lines.
I have seen this technique done where the homeowner wanted to DYI project and it went really gone wrong.
• First mistake was that they used a rectangular kitchen sponge, they didn't change the direction of the sponge each time they touched the wall with paint. This did not wind up with a good result.
• It is also important when using a sea sponge to wet it thoroughly and squeeze it out completely a few times to get any loose sand out of it. Remember, this was a living sponge at one time, in the sea so, although it is processed into a tool for painting or cleaning, it still may hold some sand, that you do not want on your walls.
When sponging I like to have paper plates available, so when I 'load' my sponge, I can dab it onto the plate to get off all of the excess for an even covereage.
One of the first techniques I taught myself and mastered! This effect works in so many rooms! These shots show simple sponging, and then the second is ragging with a "touch" of sponge to add that stippled effect for a more detailed and intricate look.
RAGGING (on or off) The ragging effect also adds the highs and lows, with a more defined line that you control with the folding of the fabric you are using. - this is a technique best done with clean cotton rags.
• You can use old socks, t-shirts work wonderfully or old towels. It is best to work with small, manageable pieces of cloth that can easily be held in your fist. It is important to change the rag often to a clean rag so it does not get to saturated with paint, as this will change how the wall looks from when you begin the process to the end.
• Although the result you want from ragging is a non uniform appearance, you do want some consistency of coverage. A saturated rag will give you too much coverage and therefore look very different from when you start the process with a clean cloth. Practice here pays off!
Using different textured materials will create a raised surface effect, but BEWARE, these can be messy and not as easy as the two listed above.
CELLOPHANE - this creates a more intense look for your walls. I learned it is not as easy as it looks or sounds. To summarize you apply the base coat to your walls. When dry, you mix a second color with glaze and apply paint in small sections, place cellophane over the area and then remove; be sure to have your cellophane cut prior to starting, trust me here. When you take cello off, it removes some of the applied second color and leaves a very textured look on your wall. Have a garbage pail or bag nearby to place the paint colors cello.


TISSUE FINISH - for this finish I thought it would be really neat to add texture to the wall, actual texture! I did all I listed above for the cellophane, but instead of placing the tissue on and pulling off, I put the tissue up and "smooshed it" on the wall, painted over it with glaze and moved on until the entire room was covered and had this cool textured effect. Issue is that if you get tired of this ( which I am now, after 12 years... not too bad) it is hard to get off!
VENETIAN PLASTER- one of my favorites, but hardest and most labor intensive technique to do! This in essence creates a look of plaster on your wall, yet when done correctly and "burnished" properly has the feel on the wall to the touch smooth as glass or marble.
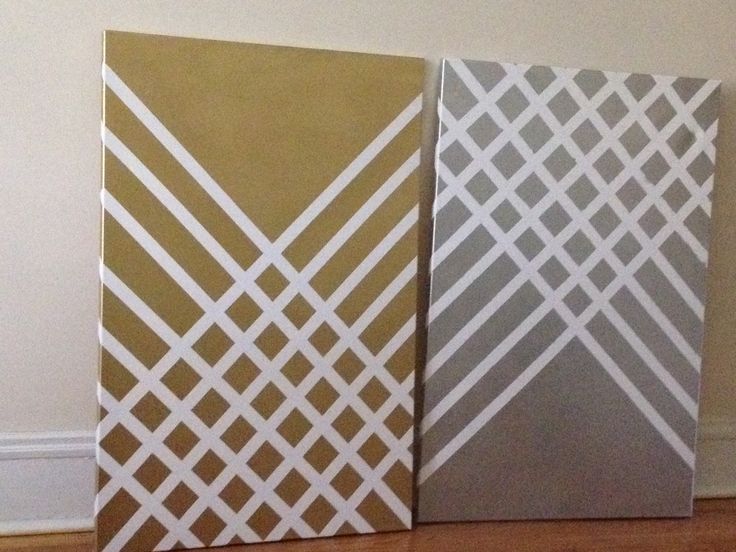
STRIPING OR COLOR BLOCKING - blue tape is your best friend here! With this technique you can create stripes of varied widths, blocks, geometrics and even a silhouette effect of trees or anything.
• With this technique you can choose to do a monochromatic palette of mix colors depending on the room and style you like.
• It is best to have a definite idea in mind here before you start. This method takes a solid plan! Measure off your wall and determine your design, determining where to tape (where the wall color will stay) and where to paint to create your design.
• If stripes are what you want, this is the best technique- when the wall is dry and you pull the tape off, you have stripes! Be sure to figure the width of each and definitely have a ruler handy when taping!
• For other shapes, it is not as easy as it sounds as you need to carefully plan out the design and consider drying time in between so you can tape off the shape you painted and add another adjacent to it, a bit more planning needed here.
The color-blocked design was carefully planned out in a monochromatic gold palette in this bedroom.
Chevrons, plaids, diamonds, all geos! Anything is possible! Let your imagination run wild!
Other techniques include but are not limited to: Stippling, Glazing and Marblizing
SPECIAL TIP: think about color; the best, and most successful faux painting projects, to me, are monochromatic!
Some great books if you want to do-it-yourself.
An older book, but one I love! This one, Creative Paint Finishes for the Home gives you step by step instructions for painting walls, floors and furniture! They include so many techniques with easy to follow instructions.
Angie's list might also provide you with local artists who specialize in different techniques. The best way to find a responsible local artist is to reach out to your network on facebook! People like to talk, and post about things they love and I would bet you know someone who has had at least one room "faux painted" and would be happy to share their secret.
What faux treatment is best for your home?
For more on faux painting techniques, reference an earlier post ....


No comments:
Post a Comment